Pumped Up Polynesian Pig Pizza

Pizza
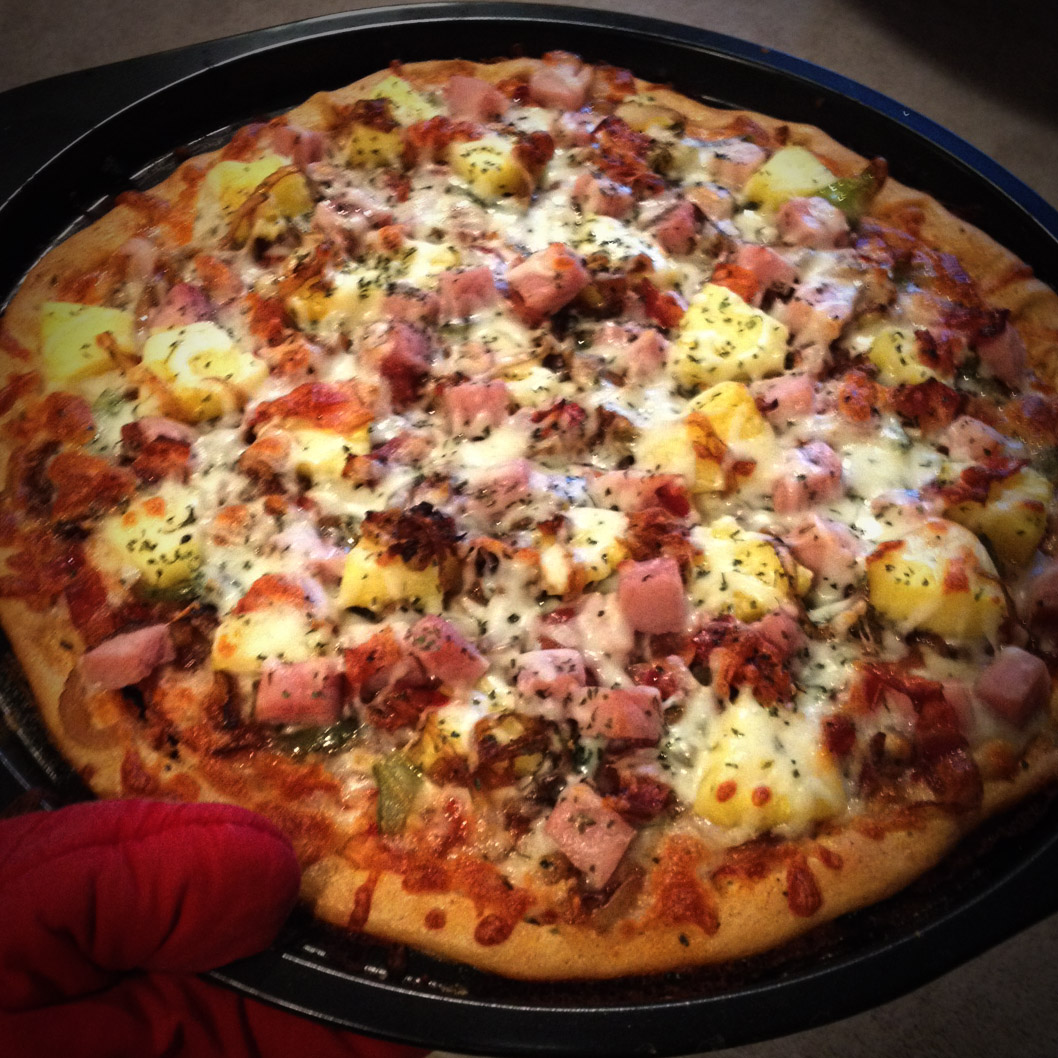
Aloha!  I’ve been on kind of a pizza kick lately.  For instance, the other day, we made a pizza with pesto, caramelized onion, mushrooms, prosciutto, mozzarella, and arugula.  That was some TASTY business.  THIS pizza was also insanely awesome.  How could it not be, with a name like “Pumped Up Polynesian Pig Pizza?”

This was a bit of an experiment a month or so ago, since I had pizza dough to use and I was ready to get creative with a new pie.  Liz loves Hawaiian pizza probably more than any other kind, so I decided to go in that direction.  When I think about the different kinds of hawaiian pizza we’ve had from different places, a lot of them seem kind of boring.  A lot of times it’s literally just cheese, ham, and pineapple.  Which, you know, whatever.  It’s going to taste good however you slice it.  But I got to thinking, there are so many more creative things I could add to this!  My brainstorm took me from a simple ham and pineapple pizza to a pizza that included all kinds of trimmings:

  • 1 medium onion, sliced and caramelized (see below)
  • 1/2 green bell pepper, diced and sauteed
  • 2 cloves minced garlic
  • 1/2 pre-cooked and packaged ham steak, diced
  • 1 C. fresh diced pineapple
  • 1/4 C. fresh cilantro, chopped
  • 1-2 C. shredded Mozzarella cheese (or pizza blend, mozzarella and provolone)
  • 1/4 C. crumbled Feta cheese
  • 6 strips cooked, crumbled bacon
  • Tony Chachere’s Creole Seasoning
  • Olive oil
  • Marinara sauce
  • Butter
  • 1 tsp. sugar
  • Pizza dough (for dough recipe, see: Mexican Chipotle Chicken Pizza)

So here’s how this goes.  There’s a good deal of prep to be done, and it’s a little time consuming, but it’s worth it, I promise.  Here’s the way I would do things.

  1. Preheat the oven to 400.  After you roll out your dough and get it onto a sheet, you’re going to need to prick it all over with a fork and brush a little olive oil on it.  At this point, also season it around the edges with the Creole seasoning.  You won’t be sorry– Cajun crust is awesome.  Just bake the dough part-way, for about 5-8 minutes until it’s partially baked and the sauce won’t make the dough soggy.  Once you take it out of the oven, crank the oven to 500 degrees.  Not kidding.
  2. Slice your onions into ribbon-like slices.  With a tablespoon or two of butter, sautee them on medium (or just under medium) until they’re soft and a little transparent.  Then, add the 1 tsp. of sugar and stir.  Continue cooking until they’re nice and brown all the way through (this takes quite a while, so leave them alone a little and prep your other veggies).
  3. Sautee green peppers with a little oil and salt.  When they’re pretty tender, throw in the diced ham and minced garlic.  Just let that sweat together for a minute or so.  Remove that from heat and set it aside.
  4. Spread a layer of marinara over your prepared crust.  You can use however much you like; I happen to like a little less sauce. Sprinkle some of the mozzarella over top, not a lot. Then, top with caramelized onions, sauteed peppers/ ham, feta, more mozzarella, bacon, and pineapple.
  5. Bake it off for about 10 minutes in the 500 degree oven, or just until the cheese is all melted and starts to brown slightly.  Remove it from the oven and top with the fresh cilantro.  You could also elect to save some of the pineapple for after the baking process, as it will retain more of its “fresh” sweet flavor.
  6. Enjoy it, yo!

Brined Pork Chops

photoEvery year, we have pork and sauerkraut on New Year’s Day for good luck in the following year.  Not sure exactly how the tradition originated, but I assume it’s a German thing (since my family is German).  However, my uncle and cousins aren’t big on the ‘kraut, so we always have pork chops for them to eat.  This year, along with my green beans almondine, I made brined and oven-baked pork chops with a spice rub and topped with a slice of apple.

Gone are the days when you made a pork chop that turned out tough and dry.  A brine is a great way to ensure a juicy and flavorful (and tender!) pork chop, so why would you skip on this quick and easy step ever again (peer pressure)?  If you’re not familiar with it, brining is a technique you can use for several different kinds of meat, but it basically draws moisture and seasoning into the meat and provides for juicy and tender meat that cooks quickly.  You also don’t have to soak the meat for a very long time, which is great if you’re pressed for time.  Throughout the summer, I use the technique for grilling pork chops with a mesquite rub on them, and I have yet to have a bad result.  Here’s the process– for every cup of liquid you use, add 1 tbs. of salt, and 1 tbs. of brown sugar.  So, you can have anywhere from 3-100 cups of liquid, as long as you use 3-100 tablespoons of salt and brown sugar.  The only situation I could think of in which you would need that much brine would be if you were brining a very large piece of meat (like a whole rack of ribs, or a whole turkey).  Many people have produced great results brining a whole turkey and roasting it in the oven… I would really like to try it.  Anyway, this is a recipe for 6 boneless pork chops.

BRINE:

  • 3 C. warm water
  • 3 C. apple juice (optional– you can just use 3 more cups of water)
  • 6 tbs. salt
  • 6 tbs. brown sugar

SPICE RUB (you can adapt this to taste however you want, or use a pre-packaged rub):

  • dried mustard
  • seasoned salt
  • paprika
  • garlic powder
  • marjoram
  • thyme
  • 1 large apple (I like honeycrisp) sliced width-wise into 6 –  1/4″ slices.  Substitute pear slices if desired.
  • 6 tsp. brown sugar

Dissolve the brown sugar and salt in the warm water, then add the apple juice.  If you’re not using apple juice, just use 6 cups of warm water to dissolve the salt and brown sugar.   Remove the THAWED (but cold) pork chops from package, and perforate with a fork.  Soak in the brine for 15-30 minuted.  You may refrigerate during this time if you choose.

Remove from brine and pat dry with a paper towel.  Sprinkle one or both sides of the meat evenly with each spice on the list, then rub it in with your hands.

On high heat, in a large, oiled, skillet, quickly sear both sides of the meat to seal in the juices.  Remove from pan, and place on a baking rack on top of a cookie sheet (to catch pan drippings). Top each with an apple or pear slice and then 1 tsp. of brown sugar.  Cover loosely with foil.

Place in a 400 degree preheated oven for about 15-20 minutes, or until meat is cooked thoroughly (140-145 degree internal temperature with a thermometer).  I cheat, and cut into the chop to check.  This will, however, release juices from the chop, so don’t do this to all of the chops.  Move to a serving platter, pour pan drippings over the chops, and tent with foil.  Allow the chops to rest for 5 minutes before serving, as they will continue to cook from their internal temperature.

Enjoy!

White Turkey Chili

photoDon’t have time to make dinner?  This takes about 20 minutes, give or take.  No more excuses!  I mentioned this chili in a previous post, when I said one of my favorite pairings is my Jiffy corn muffin hack with white turkey chili.  Since I’ve had a lot of requests for recipes that are easy and can be done in a crock pot, this was a natural next choice.  Also, many of my friends have enjoyed this chili over the last several years, and they’ve all been yelling at me to blog about it. 🙂  One thing, though.  I’m not just giving your the recipe, I’m giving you 3 recipes in 1.  You get the original version, with 2 other variations on the same thing.  Have fun experimenting!

This is not your mama’s chili, but as soon as you make it, your mama will want to too.  In fact, this is not my mama’s chili either– it’s my aunt’s.  She used to make this all the time when we all would come for family gatherings, and then finally I just bummed the recipe off of her.  I made it in college for my friends, and they were always insanely impressed.  What I didn’t tell them is how stupid easy this recipe is.  Now that Liz and I are married, her coworkers can’t wait until it’s her turn for soup day, because they know that means I’ll be making this to send in with her (even though I’m the cook around here, even she knows how to make this, it’s so simple).  It’s quick, easy, delicious, and filling.  Also, it’s easily adaptable and you can do about 8,000,000 different things with it.

Like the other chili I posted, this is not a traditional kind of chili where you have to use a hodgepodge of ingredients to get a great flavor.  You can adapt and add things though, if you like certain things that aren’t in there, or to get the level of spiciness you want.  My White Turkey Chili literally only has 4 ingredients. I’ll list those first, because I can tell you, this chili is outstanding with just these 4 things.

THE ORIGINAL

  • 1-2 lbs. ground turkey
  • 1 – 48 oz. jar (glass jar) Randall great northern beans
  • 1 – 16 oz. jar salsa of your choice (I use Pace mild, you can use whatever you want)
  • 1 – 8 oz. block of monterrey jack cheese, cut into small chunks

All you need to do to make a pot of the good stuff is to first brown the turkey in a large pot.  After that, you could then transfer the turkey to a crock pot, or you can continue in a regular pot.  If you’re going to have people over, you might want to go the crock pot route.  Next, throw everything else in and heat it until the cheese has melted.  You’ll need to stir a lot to get the cheese incorporated– everything should become thoroughly mixed, and the cheese will lighten the color of the soup.  Serve it hot, obviously, and with tortilla chips.

Now.  Now that I have told you how to make it with the basic 4 ingredients, let me give you 2 ways you can adapt it.  First off, If you’re making this for a crowd, you might want to think about making a little extra.  Also, when I went to the store this last time, they didn’t have the big glass jar of beans, so I had to improvise.  Here’s an extra large recipe, with a little something-something extra.

FOR A CROWD… AND WITH A TWIST

  • 3 lbs. ground turkey (I found a 3 lb. package at the store)
  • 4 – 15 oz. cans of great northern beans
  • 1 – 16 oz. block of PEPPER JACK cheese (see what I did there?) 😉
  • 1 – 24 oz. can of salsa of your choice
  • 2 cans of Rotel tomatoes and green chillies
  • 2 Tbs. ground cumin

The process is the same for this, just make sure you’re using a really big pot.  After you brown the turkey, season it with the cumin.  Then go about the rest, and just dump in everything and heat it until you can incorporate the chunks of cheese fully.  If you don’t want to make this much, just use the measurements for the original version, but add a little cumin and sub in the pepper jack.  Next up is the way my mother-in-law makes it.  It’s more like a chicken enchilada soup this way, but it’s just as easy and just as good!

MAMA ROSE’S CHICKEN ENCHILADA WHITE CHILI

  • 3 cans of chunk chicken in water
  • 1 – 16 oz. jar salsa of your choice
  • 1 – 8 oz. block of pepper jack cheese, cut into small chunks
  • 1 – 48 oz. jar Randall great northern beans
  • 1 – 15 oz. jar of corn
  • 2 C. chicken broth

The process is now even simpler, because you don’t have to brown any meat.  You just throw everything together and heat it until the cheese melts.  Enjoy!

Mediterranean Deviled Eggs

photo 2 (1)This “recipe” is hardly even that… it’s so easy.  It’s also really tasty, while still low in calories, and high in protein.  This makes a great fitness breakfast if you’re getting into running or working out.  All through the summer I ate it almost every day.  The possibilities for these eggs are endless, and you can change it up any way you like.

SCIENCE CLASS:

First, eggs are great muscle food, given that they’re high in protein and good fats.  The cholesterol in the yolk is something some people shudder at, but honestly it’s not so huge an amount that it will be of great detriment to you if your diet is otherwise well-balanced.  Something else to consider is that egg yolk is a great source of protein, so if you’re trying to maintain a high-protein diet, you may want to think about leaving those yolks in there.  Here’s the kicker though; you can add MORE protein to these eggs without adding a huge number of calories by topping them with hummus.

If you don’t know what hummus is or have never tried it, do yourself a favor and DO IT.  Hummus is great as a snack with veggies or whole wheat pita chips, and again, it’s high in protein and low in calories.  Also, did I mention it’s delicious??!  It comes in probably a million different varieties, so you can really get creative with the kind you choose.  I like good ol’ classic hummus, from which mostly you get the nutty flavor of the garbanzo beans (chickpeas) and sesame tahini, as well as a vague garlic flavor.  It’s great.  However, if you’re a big fan of garlic (which, I may add, is great for your heart AND cholesterol), they make roasted garlic hummus.  In this recipe, there is also a bit of pesto, which has garlic in it already.  One of my other favorites is roasted red pepper hummus.  Lastly, if you dig the spicy variety, you can either find hummus that accommodates that taste or you can add a little bit of your choice of hot sauce on top.

Here’s what you’ll need:

  • 2 large hard-boiled eggs (see directions below)
  • 2 tbs. hummus (Sabra brand is awesome, and comes in lots of great flavors)
  • 1 tsp. prepared pesto (make it or buy it in a little jar)
  • Sliced cherry tomatoes (optional)… now that I think of it, sun-dried tomato would be delicious on these.

DIRECTIONS:

  1. First, hard-boil your eggs. Here’s how you do it.  Take however many eggs you’d like to boil (I do mine about a dozen at a time) and put them in a large pot.  Cover them in water until it’s about an inch higher than the tops of the eggs.  Bring them to boil on the stove and bump the temp down to medium high– enough to keep it boiling but not so that it’s boiling over.  Set the timer for 6 minutes once the water starts to boil.  When the timer goes off, remove the eggs from the heat, cover them, and set the timer for another 6 minutes.  Next, drain the water out of the pot (careful not to break the eggs!), and run a cold tap into the pot continuously for another 6 minutes (allow it to overflow like a fountain).  Once you’ve done that, your eggs should be cooled, fully cooked, and ready to use.
  2. Take the shell off of 2 eggs. Slice them in half lengthwise.  At this point, you may decide whether or not you want to keep the yolk in the eggs.  I always keep it.  Usually, with deviled eggs, you would blend the yolk with the other toppings.  You can do that if you want to, but it’s totally not necessary.
  3. Top each egg with 1/2 tbs. of hummus (1 1/2 tsp).
  4. Add 1/4 tsp. of pesto to each egg.
  5. Place a wedge of tomato on top of each egg, if desired.

It’s that easy.  If you don’t want the pesto (extra calories…and flavor), no worries.  these are great with just the hummus if you’re in a rush.  Some also prefer to add other toppings like a dash of hot sauce (try Frank’s Red Hot!).  The possibilities are endless!

Pacific Shrimp Tacos

photo 1There are a few things in my repertoire that I feel particularly proud of.  These are one of those things– and these can also be made with breaded tilapia.  In fact, these are pretty similar to my famous fish taco cups, which make a great party appetizer, and they always have everybody talking for months.  That, though, is a recipe for another day.

My Pacific Shrimp Tacos have a chipotle slaw and juicy chunks of mango that give the blackened shrimp a spicy, savory, sweet flavor.  Add to that the texture of the creamy, buttery avocado, and you have a killer bite.  Here’s how to do it:

SLAW:

  • 2 C. Shredded Cabbage/ Slaw mix (you can use pre-bagged or slice your own.  I recommend Napa Cabbage if you slice your own)
  • 1 tbs. Sauce from a can of Chipotles in Adobo Sauce
  • 1/2 C. sour cream
  • 1 tbs. fresh lime juice
  • 1/4 C. pureed avocado (just use a couple slices from 1 whole avocado)
  • 1 tbs. cilantro
  • 1/2 tsp. garlic powder
  • Sea salt

When you’re making the slaw, combine everything but the cabbage in a food processor and pulse until smooth.  Then, in a medium bowl, toss the cabbage in the mixture until it’s evenly coated.

SHRIMP (cook these last so they don’t get cold and gross):

If you have never peeled shrimp for cooking, here’s a tutorial.

His shrimp still have the head on them, but I’ve never used whole shrimp like this.  One additional step is that you’re going to also want to pinch the tail off of these, or you’ll be biting into shrimp tail inside your taco, which would be nasty.  Basically, once you’ve got the shrimp peeled/ deveined, toss them in olive oil and sprinkle them with blackening spice.  You can put them in a freezer bag and shake to coat if you like, to save on the mess.  Then, spread them on an oiled baking sheet and put them under a broiler at 500 degrees.  You’re going to have to watch these, because they cook up pretty quick.  When the ends touch and they’re opaque white and pink, they are done.

ACOUTREMENTS/ TRIMMINGS:

  • Taco-sized flour tortillas (Mission brand are good… and be careful to buy good, soft ones if you’re not making them yourself)
  • Fresh Cilantro, chopped (comes in a huge bundle for less than a dollar)
  • Fresh, Ripe avocado, cut into slices (Tutorial for cutting an avocado below)
  • Fresh, ripe mango, diced into 1/2″ chunks (Tutorial for cutting/ peeling a mango below)
  • Fresh Lime
  • Diced red onion (optional)

How to pit/ slice/ peel an Avocado:

How to cut/ peel a Mango:

SOME ASSEMBLY REQUIRED:

  1. Once you’ve got your slaw and cold ingredients all prepared and ready to go, go ahead and cook up your shrimp.
  2. Lay out your tortillas and put some slaw on those bad boys.
  3. Next, you’re going to put some mango and a few slices of avocado on them.  If you want onion, go ahead with that too.
  4. Get 4-5 of those shrimp and line them up on your tortilla (remember, you’re going to fold this over so you can eat it)
  5. Top it off with some cilantro and a squirt of lime juice.   Time to enjoy the fruit of your labor. 🙂

Classic Tuna Melt

photo 1If you’re a fan of the classic cafe tuna melt, this one is calling your name.  No kidding, this sandwich may have changed my life.  Seriously?  So good.  In this recipe, there are a few other tips you can use for other things, too!  Keep your eyes peeled.  For this grilled sandwich, we’ll grill the bread without the fixin’s on it, so that we don’t make a mess.  Also, it’ll keep the tuna salad cool and the bread hot, which is a great contrast.

This is like two recipes in one, because the first and most important step in the process is having a really good tuna salad to go on your really good tuna melt.  Having a mediocre tuna salad would give you a mediocre sandwich, right?  Don’t be that guy.  Or gal.  I’ll share all my secrets for a great tuna salad, because keeping it a secret would not do me any good since I’m the only one at my house who likes tuna salad to begin with.  You could doctor this up if you wanted to by adding some diced onion, celery, walnuts, or grapes, but I don’t honestly think it’s necessary.  When I made this, I thought it was so good that I’m not sure I would want to try to change it.  Here’s what you need:

TUNA SALAD (1-2 servings)

  • 1 small can chunk light tuna in water
  • 1 tbs. soy sauce (secret ingredient)
  • 1 tbs. regular mayonnaise
  • 1 tsp. spicy brown (or dijon) mustard
  • 1 tbs. sweet pickle relish

DIRECTIONS:

  1. With the lid of the can, squeeze the water out of the tuna.  In a small bowl, mix the tuna and soy sauce and allow to sit and marinate for a few minutes.
  2. Add in the other ingredients and stir to combine.  Taste it and adjust to taste.

If you’re like my mom, you’ll say “I don’t like soy sauce.” and avoid using it altogether.  Don’t.  Because it’s awesome, and in the tuna salad, you can’t taste it at all anyway.  It’s just a little added kick and a bit of saltiness that you WILL miss if you don’t add it in.  Trust me.

NEXT STEP.  The sammich.  Oh, the sammich.

  • 2 slices of some really good 12 grain bread
  • 1 tbs. butter (don’t you DARE substitute!)
  • ground sage
  • sea salt
  • sliced cheese of your choice– I recommend swiss or farmer’s cheese, but white cheddar would be nice as well

DIRECTIONS:

  1. Remember when I said there would be other tips you can use for other things?  You can use this any time you make grilled cheese or any kind of grilled sandwich.  Melt the butter in a medium pan (needs to fit both pieces of bread).  When the pan is coated, dip each piece of bread in the butter to coat one side of each slice.  This is the solution to un-spreadable refrigerated butter.
  2. Here’s another tip to use for grilled sandwiches:  Lightly season the buttered side of each piece of bread with the sea salt and sage.
  3. Buttered-side down, place the bread in the pan over medium-low heat.  Top each piece of bread with a slice of cheese.  This is important.  It will create a barrier preventing the tuna salad from making the bread soggy.  Toast the bread until it’s golden brown and the cheese is melted.
  4. Put the tuna salad between the cheesy sides of the bread and cut it in half.  Nom away.

Quick and Dirty Weeknight Chili

ChiliReaders, this is probably the Un-Snootiest recipe I have yet to post.  It’s fall now, so that means it’s time for things like pot roast, chili and cornbread (see next post!), and all things pumpkin and apple.  Guess what though?  The best part about some of these recipes is that they can be SO EASY.  And un-snooty.  And plain delicious.  This chili is an easy weeknight soup you can probably make with stuff you buy often and have sitting around your pantry.  That’s what I did!  One night I was scrambling to find something for dinner, looking through the cupboards and taking inventory of all the odds and ends sitting around.  Here’s what I found:

  • 1 jar of Pace brand salsa
  • 2 cans black beans
  • 1 can great northern beans
  • 1 can Campbell’s tomato soup
  • 1 packet of taco seasoning (random generic brand)
  • 2 lb. package ground beef
  • 1 small onion
  • 2 – 3 cloves garlic, minced
  • 1 tsp. or so extra cumin (to taste)

These are just the things I found sitting around.  For you, the possibilities are endless!  Now, let’s talk about the ingredients.  When you make chili, you probably use a different method than just about every other person you know.  Chili recipes are simply a means to an end, I think.  Everyone has one that they claim is the best, but most kinds of chili taste like most kinds of chili.  Some people throw in a little sugar, I do not.  I don’t dislike chili with sugar in it, I just don’t think it’s necessary.  Lots of people use cans of seasoned beans, or seasoned tomatoes, or seasoned sauce, or seasoned whatever.  Mom always used to use these “Chili Fixin’s” cans that had chili seasoning in them.  Something you need to realize right now, though, is that those seasonings are the same thing, more or less, as a packet of taco seasoning.  And I know I always have those sitting around.  If you don’t, chili powder and cumin and maybe some seasoning salt will probably work just fine.  Also, for a little extra kick, you can throw in a can of Rotel brand tomatoes and green chilis.  I didn’t have one, but that’s another item that’s usually lurking about my pantry.

The beans I chose to use were simply because that’s what I had on hand.  These are not typical chili beans, but who the eff cares?  Beans are beans (don’t quote me on that), and in the chili, the texture and flavor is just about the same.  Black beans are good for you, first of all, so if you can sub those into your chili, it’s not a bad idea.  Also, while kidney beans are typically the beans one would use for chili, I didn’t have them and wasn’t going to the store.  Also, just about everybody has a package of ground beef, an onion, and some garlic sitting around.

DIRECTIONS:

  1. Brown the ground beef in a big stock pot.  When it’s almost done, add in a small chopped onion; don’t drain the beef.  You need the juices to cook the onion, which you can chop as finely or as coarsely as you like your onion to be.  I diced mine.  When the onion is pretty translucent and tender, add in the minced garlic (I used a garlic press) and let it become fragrant.  Should only take a minute.
  2. Add in the can of tomato soup and scrape the bottom of the pan to remove any crusty, tasty bits.  Then, open the other cans and throw the rest of the ingredients in the pot.  You don’t even need to drain them.  Stir it up and simmer it.  Don’t forget to taste test, then add any other seasonings you want.

Hey, you know what?  It’s literally that easy.  If tonight weren’t taco night, I might have made a pot myself.

Mexican Chipotle Chicken Pizza

This was the bomb.  Like, really good.  There are several parts to it though, so bear with me.  I would say the thing that makes this dish so good is its “authentic” Mexican ingredients, like lime juice, cilantro, avocado, and adobo sauce.  Then, add to it the homemade pizza crust, and you’ve got one killer bite.

Not that nobody else has ever made a Mexican pizza, but I did not refer to a recipe for inspiration on this one.  The thing that started the idea wheel turning this time was that we recently got a KitchenAid mixer, which made the whole dough-making process a lot less daunting and actually, really easy.  Even without one though, you can do this at home without too much trouble.  People have been making dough for hundreds of years without the use of a KitchenAid mixer.  Or, hey, you could even just use a pre-made crust from the store if you’re not feeling particularly ambitious.

Then, there’s all the components that go on the pizza.  Luckily, many of those things are things you may have around the kitchen already.  In any case, it makes this particular pizza kind of time-consuming and potentially expensive to make.  Here’s a list of things you need:

SHOPPING LIST:

  • 1 ripe (soft) avovado
  • Fresh cilantro (chopped)
  • Small can of corn (drained)
  • Can of black beans (drained)
  • Mexican cheese blend
  • Marinara sauce (most any kind will do, since you’ll be using salsa too)
  • Salsa (again, any kind you like)
  • Lime juice (you can use the kind in a little plastic lime if you must)
  • Sour cream
  • Whole wheat flour
  • All-purpose flour
  • Rapid-action yeast packet
  • Salt
  • Sugar
  • Frozen pre-grilled chicken strips (Tyson)
  • Olive Oil
  • Seasonings (cumin, coriander, seasoned salt, pepper)
  • Adobo Sauce (from small can of chiles in adobo sauce)
  • onions and peppers (sometimes you can get these pre-sliced and mixed in the produce section)

Step 1: Make the dough. 

My dough was a recipe I found online, nothing terribly different, difficult, or special about it.  Here it is:

  • 1 tsp. rapid-action yeast
  • 1 tsp. sugar
  • 1 C. hot tap water
  • 1 C. whole wheat flour
  • 1 1/4 C. all-purpose flour
  • 1 Tbs. E.V. Olive Oil
  • 1 tsp. Salt

In a measuring cup, get your hot water from the tap and dissolve the sugar.  Then, put the yeast in the cup, so that it distributes across the surface of the water.  Leave to sit for 10 minutes, until yeast activates and becomes foamy.  Then, add the olive oil and salt to the mixture.  In your mixing bowl, combine the mixture with all of the flour.  kneading with oiled hands or using a dough hook in a stand mixer, knead the dough until smooth.  Adjust the consistency as needed by adding warm water or extra flour.  Then, form into a ball, leave in the bowl, and cover with a damp cloth.  Let it rest for about 15 minutes, until it’s noticeably larger in size.

Step 2: Make the components for the pizza.

1) The peppers & onions: In a pan, heat a tablespoon or a little more (I always eyeball everything) of olive oil.  Then, add the onions and peppers and salt them lightly.  Sautee until brown and soft.

2) The chicken: I buy the Tyson brand pre-grilled chicken (and now Giant Eagle has their own brand too!) to save time, but this would be even better if you marinated and grilled your own chicken breast.  Here’s how I did it.  In a medium saucepan, heat 2 tablespoons of olive oil.  Then, add enough of the chicken to evenly cover a pizza.  Sautee until lightly browned and no longer frozen.  With a spatula, chop into equal-sized pieces.  Now, the fun part.  Season with 2-3 tablespoons of the adobo sauce, 1 tsp. cumin, 1/2 tsp. seasoned salt, and 1/2 tsp. coriander.  Stir until evenly coated.  Taste, and adjust seasonings.

3) Lime cream sauce: This is reserved for after the pizza is already baked (so is the fresh cilantro and avocado).  I also make this sauce whenever I make my famous fish tacos (for a later post).  It’s easy.  In a food processor, combine 1/4 C. sour cream, 2 Tbs. lime juice, a pinch of cumin, a pinch of salt, 1 Tbs. cilantro, and 1/4 of a ripe avocado.  Process until smooth and uniformly creamy.

Step 3: Pizza time.

Preheat the oven to 425.  Roll your dough out onto a surface lightly coated in corn meal (if you have some, if not, use A.P. Flour.  Transfer to a pizza pan.  Lightly coat the dough with marinara sauce, and then spoon and evenly distribute some salsa along with it.  Then, add the peppers and onions evenly.  Sprinkle a thin coating of Mexican cheese blend on top of that.  Next, evenly distribute the chicken on the crust.  Top that with the black beans and corn; you will NOT use the whole can of either of these.  Just eyeball it.  Top liberally with more cheese.  Bake for 15 minutes, then drizzle with lime cream sauce, sprinkle with chopped cilantro, and top with slivered avocado.

You’ll be the belle of the ball if you serve this to your guests.  Or the… hottest gringo at the fiesta… or something…

Shrimp Pad Thai

Ok.  As I said in my welcome post, I plan to integrate some recipes I find from other blogs and things like that.  This is one of them– it’s from a blog called skinnytaste.com.  She has TONS of really great healthy recipes.  There are a few I have done that are really quite good, and a few that I wasn’t as wild about.  A few of the recipes frankly have so much flavor that you can’t even tell they’re healthy.  This one falls into that category.

http://www.skinnytaste.com/2012/06/shrimp-pad-thai-on-lighter-side.html

The recipe is all right there for you.  Just a few notes on what I have had success with when I’ve made this recipe before.

1) You can add your favorite Thai/Asian stir fry ingredients to the mix.  One of my favorite things in Asian cuisine is Napa Cabbage, which I believe is actually Chinese.  I make Lo Mein on occasion, which has tons of sliced Napa in it.  So, naturally, I think it goes nicely in Pad Thai also.  I also add Shitake mushrooms (Japanese, not Thai).  I buy them dried, soak them in warm water for about 20 minutes, and then slice them and add them into the recipe.  One cool thing about that is the left over water from soaking dried mushrooms is concentrated with mushroom flavor, which you could add to the dish if you wanted to.  Another thing I like in my Thai food is a good helping of fresh, chopped cilantro.

2) The recipe doesn’t mention this, likely because it’s a lighter recipe, but when you put in the oil, it’s a good idea to also use a little toasted sesame oil (in the Asian food section at the grocery store).  Once you smell/ taste it, you’ll understand why it’s pretty much essential to the dish (and any other Chinese or otherwise Asian dish).

3) This seasoning mix she has you make is BOMB.  Way awesome, and packed with great Thai flavor.  I, however, add a tablespoon of soy sauce and a healthy spritz of lime juice (you can also save the lime juice until the end and then spritz it over top like she suggests).  You may ask, what is this “Thai fish sauce?” Essential to the dish, that’s what it is.  It’s also in the Asian section at the grocery.  You can’t substitute clam sauce, just in case you were wondering.  Fish sauce is a unique Thai ingredient that makes its way subtly into many Asian dishes (like Lo Mein, for instance) and most times you would never know it.  Unless it were missing.  Just don’t open up the bottle and smell it, as it’s pretty foul-smelling, but its salty flavor adds so much to a dish.

4) When you go looking for the Pad Thai noodles at the store, those are also in the Asian section.  They will likely be called “Rice Noodles” or “Rice Stick Noodles” or something to the like.  They are flat noodles, like linguini, and will likely be in a box.  The first time I made this recipe I had a really hard time finding them, so I just used Lo Mein noodles instead.  That worked out well and tasted just as good, but they just aren’t “Pad Thai” noodles.   When you boil them, the starch from the rice will thicken the water to a hefty degree.  It can make the noodles pretty gummy when you go to drain them, so rinse them off with cool water before you put them in with everything else.

Give this recipe a try!  If you love Pad Thai, you’ll love it.

How to Make Plain Old Spaghetti Instantly More Awesome

I recently had people over for chicken parm.  I’ll have to give you the recipe. 🙂 My spaghetti, crazily enough, was a pretty big hit.  Mostly, it was because of the sauce.  We’ll get there.  I maintain, though, it’s because of a few other steps I took to avoid boring sketty.

Maybe I’m the only person who maintains that plain spaghetti and sauce is a little boring.  Even with meatballs or chicken parm.  There’s something about the noodles themselves that needs a little improving to make spaghetti more awesome… or else it’s just noodles and sauce.  And that’s boring.  My grandma used to make spaghetti that was better than the run-of-the-mill spaghetti with sauce, and when I was little I never understood how or why it was better.  Now I do.

First, you have to start with the spaghetti itself.  Does the noodle matter?  Well, yes and no.  Obviously spaghetti that’s handmade is going to be better.  But that turns the single most convenient weeknight dinner into the least convenient, most laborious weekend meal.  If you’re going to make homemade spaghetti, you better have the entire mob coming over for dinner, so you don’t waste all your time preparing enough noodles for only two people.  So, in the event that you don’t have that kind of time (and who does?), I would say pretty much any kind of regular boxed spaghetti will suffice.  I like a good, thick spaghetti.  Angel hair is not my bag, but some people are more into that kind of thing.  I personally think angel hair (preferably with some kind of oil-based garlic sauce) goes much better with a light kind of supper, like some sort of fish.  Often, I like fettuccini even better than spaghetti.

The more important thing is how you cook it; some of this may seem sort of obvious if you have ever seen a single cooking show in your life.  The first step is to salt the water pretty generously.  It needs to taste like ocean water.  Some cooks say this is the only chance you have to flavor the noodle itself during the cooking process… to me, that seems a little harsh.  It’s like if you don’t salt the water, the noodle has no hope left in the world of one day gaining the flavor it sorely lacks.  I don’t think that’s necessarily true, but hey.  If you have an opportunity to give the pasta some extra flavor, why not?  Also, throw in a drizzle of EVOO to keep the noodles loose and independent (quite a combo, no?) once they’re drained.  Now, how long should you cook them?  Well, that depends on the noodle.  For a larger, thicker noodle, you need to cook it a little longer; there is no rule of thumb for exactly how long.  Don’t be afraid to get a piece of the pasta out of the water and taste test it.  Actually, you need to.  The chewing texture is the most important thing about the pasta.  You don’t want to boil the living crap out of the noodles or they’ll turn to glue.  It needs to be firm but soft.  As the Italians would say, Al Dente!

Another rule of thumb is that any time you’re making a pasta dish, it’s a good idea to reserve about a cup of the cooking water (just dunk a mug into the boiling pot) in case you need it later.  Why would you need it?  Because sometimes sauced pasta can get kind of bound-up and pasty.  The water helps to break that up some.  This is especially true in the case of a home-made authentic alfredo dishes.  Once you get to the last step of your dish, if you see it’s a little thick, just adjust the thickness until you’re satisfied by pouring in a little of the starchy pasta water.

After my pasta is cooked, I drain it (but not before I have my mug of water!), and return it to the empty pot.  Then I toss it with a tablespoon or two of butter.  Once that is melted, I sprinkle the whole mess with grated Parmesan cheese.  I don’t mean fresh-grated.  I mean the kind that comes in a sprinkly can with a green lid.  Then, mix all of it together.  You could also add some herbs, but it’s not really necessary since a good sauce has enough flavor by itself.

That brings me to the next point.  The sauce… and this is very important.  The sauce is arguably the most important part of good spaghetti.  I may not have agreed with you 10 years ago, because I would have stopped at the previous step.  What is not arguable is that the best store-bought sauce I have ever discovered is MIDS.  I included a picture of the jar because it’s that important.  It’s a little more expensive than your usual off-brand or store-brand sauce in a jar, and if you try it you will understand why.  I grew up with MIDS (it’s locally produced where I grew up), never appreciating fully why it’s the only kind anybody should buy until I moved away and nobody had ever heard of it.  I tried some of the other brands and whatever, but they’re just “meh.”  MIDS has a funny way of packing all of Italy into a jar.  It’s the single most flavorful ragu I have EVER had in my life, and my dinner guests will tell you they agree.  It tastes like a homemade sauce, because it is.  Just not homemade by me.  Or you.  Also, it comes in several varieties– meat, no meat, mushroom.  I would always use meat if Liz would let me, but the others are every bit as good.

I should have mentioned this before, but when you sauce a spaghetti, you must realize one thing.  Not everyone loves their spaghetti slathered in sauce.  Including me.  BUT, I think it’s important that, unless they hate every kind of sauce altogether, the dish has sauce on it, or else it’s not really spaghetti in the traditional sense.  Remember how I said my grandma used to do something that made spaghetti better?  Here’s what you do.  Pick up from the step where you had the cheese and butter on the spaghetti.  Now, only put enough sauce on it to get what’s in the pot to be orange in color.  Like maybe 4 tablespoons (OK, maybe a little more than that).  So now what you have is a slightly creamy, sauced spaghetti that has a TON of flavor and it’s anything but what people expect when you’re serving them “spaghetti.”  The other nice thing is that if some folks do want a ton of sauce on their pasta, you can heat some up on the stove and they’ll get it a la carte. Everyone’s happy.

See? Spaghetti doesn’t have to be boring.  AND, you’re not above serving it at a dinner party.  Make it easy on yourself!  People will think you’re awesome if you follow these steps, and your spaghetti will be too.